'분류 전체보기'에 해당되는 글 192건
- 2010.06.03 T-SQL::DB_Restore_move_to
- 2010.06.03 T-SQL::Convert hex value to String 32bit
- 2010.06.03 T_SQL::CONSTRAINT조사 1
- 2010.06.03 T_SQL::SP_WHO2 + DBCC
- 2010.06.03 백업성공보고
- 2010.06.03 All DB 백업
- 2010.06.03 For컨테이너-무한루프
- 2010.06.03 스크립트task사용
- 2010.06.03 Debugging and Logging in SSIS
- 2010.06.03 유틸::엑셀이용 데이터 입력 1
- 2010.04.29 Admin::JOB 단계 설정시 option
- 2010.04.13 복제::지연된 명령어 확인
- 2010.04.05 SQL Server 2005 and 2008 Ranking Functions
- 2010.04.05 DMV::Index
- 2010.04.05 CPU 할당된 Task 상세
- --=============================================================
- -- 장비 이동하거나 DB 복원시 파일을 다른 디렉토리로 보관해야할때
- -- 파일들이 많은 DB의 경우 일일이 변경하기 어려움이 있어서 원본 기준으로 복원스크립트 생성하고
- -- 디렉토리 경로와 백업 파일 경로만 넣어주면 되게끔 생성 한다.
- --==============================================================
-
-
SET NOCOUNT ON
-
DECLARE @sql nvarchar(max)
-
DECLARE @sql_move nvarchar(3000)
-
DECLARE @move nvarchar(200)
-
DECLARE @backup_type char(1)
-
DECLARE @name sysname
-
SET @backup_type = 'L' --N
-
SET @sql_move = ''
-
DECLARE cur_restore CURSOR FOR
-
SELECT name FROM sys.databases WHERE database_id > 4 and NAME != 'LiteSpeedLocal' and state = 0
-
ORDER BY name
-
-
OPEN cur_restore
-
FETCH NEXT FROM cur_restore
-
INTO @name
-
-
WHILE @@FETCH_STATUS = 0
-
BEGIN
-
SET @sql = NULL
SET @sql_move = '' -
IF @backup_type = 'L'
-
BEGIN
-
SET @sql = 'exec master.dbo.xp_restore_database' + char(13)
-
+ '@database = ''' + @name + '''' + char(13)
-
+ ',@filename = ''''' + char(13)
-
+ ',@filenumber = 1' + char(13)
-
+ ',@with = ''REPLACE''' + char(13)
-
+ ',@with = ''NORECOVERY''' + char(13)
-
-
-
DECLARE cur_move CURSOR FOR
-
SELECT ',@with = ''MOVE ''''' +
-
name + ''''' TO N''''' +
-
filename + ''''''' '
-
FROM sys.sysaltfiles WHERE dbid = db_id(@name)
-
ORDER BY fileid
-
OPEN cur_move
-
FETCH NEXT FROM cur_move
-
INTO @move
-
-
WHILE @@FETCH_STATUS = 0
-
BEGIN
-
SET @sql_move = @sql_move + @move + char(13)
-
-
FETCH NEXT FROM cur_move
-
INTO @move
-
END
-
CLOSE cur_move
-
DEALLOCATE cur_move
-
-
-
END
-
ELSE IF @backup_type = 'N'
-
BEGIN
-
SET @sql = 'RESTORE DATABASE ' + @name + char(13)
-
+ 'FROM DISK =''''' + char(13)
-
+ 'WITH NORECOVERY' + char(13)
-
-
DECLARE cur_move CURSOR FOR
-
SELECT ',MOVE ''' + name + ''' TO ''' + filename + ''''
-
FROM sys.sysaltfiles WHERE dbid = db_id(@name)
-
ORDER BY fileid
-
OPEN cur_move
-
FETCH NEXT FROM cur_move
-
INTO @move
-
-
WHILE @@FETCH_STATUS = 0
-
BEGIN
-
SET @sql_move = @sql_move + @move + char(13)
-
-
FETCH NEXT FROM cur_move
-
INTO @move
-
END
-
CLOSE cur_move
-
DEALLOCATE cur_move
-
END
-
-
SET @sql = @sql + @sql_move + char(13)
-
-
print @sql
-
-
FETCH NEXT FROM cur_restore
-
INTO @name
-
END
-
-
CLOSE cur_restore
-
DEALLOCATE cur_restore
이 글은 스프링노트에서 작성되었습니다.
'T-SQL' 카테고리의 다른 글
| 데이터베이스 사이즈 (0) | 2010.06.04 |
|---|---|
| T-SQL::Removing Duplication Data (1) | 2010.06.03 |
| T-SQL::Convert hex value to String 32bit (0) | 2010.06.03 |
| T_SQL::CONSTRAINT조사 (1) | 2010.06.03 |
Convert Hex value to Signed 32-bit int
- /* ======================================================================== *
* Function Name: fnHexToInt *
* *
* -- Description --------------------------------------------------------- *
* Convert, up to 8 nibbles, hex string ('FFFFFFFF'...'00000000') *
* to *
* Signed 32-bit int (-2147483648..2147483647). *
* -- History ------------------------------------------------------------- *
* 1.0.0 28.Oct.2001, Ofer Bester *
* ======================================================================== */
PRINT '* CREATE FUNCTION: fnHexToInt, Ver. 1.0.0 (28.Oct.2001).'
SETUSER 'dbo'
go - IF EXISTS (SELECT 1 FROM sysobjects WHERE name = 'fnHexToInt' AND type IN ('FN', 'IF', 'TF'))
BEGIN
PRINT ' + DROP FUNCTION dbo.fnHexToInt.'
DROP FUNCTION dbo.fnHexToInt
END
PRINT ' + CREATE FUNCTION dbo.fnHexToInt.'
go - CREATE FUNCTION dbo.fnHexToInt (@Hex varchar(8))
RETURNS int
-- Ver. 1.0.0 28.Oct.2001, Ofer Bester
AS BEGIN
DECLARE @i tinyint,
@Nibble tinyint,
@ch char(1),
@Result int - SET @i = 1 -- Init nibble counter
SET @Result = 0 -- Init output parameter - SET @Hex = UPPER( LTRIM( RTRIM( @Hex ) ) ) -- Convert to uppercase
- WHILE (@i <= LEN(@Hex))
BEGIN
SET @ch = SUBSTRING(@Hex, @i, 1) - IF (@ch >= '0' AND @ch <= '9') SET @Nibble = ASCII(@ch) - ASCII('0')
ELSE IF (@ch >= 'A' AND @ch <= 'F') SET @Nibble = ASCII(@ch) - ASCII('A') +10
ELSE RETURN NULL - IF( @Result > 0x7FFFFFF) -- 134217727 = 0x7FFFFFF
BEGIN
SET @Result = @Result & 0x7FFFFFF -- Set MSB, of 7 nibbles, OFF
SET @Result = @Result * 16 + @Nibble +0x80000000 -- Shift left 4Bits, Add last nibble and convert to negetive number.
END
ELSE BEGIN
SET @Result = @Result *16 +@Nibble -- Shift left 4Bits, Add nibble.
END - SET @i = @i +1 -- Next nibble.
END -- While - RETURN ( @Result )
END -- Function
go - -- Check create result -------------------------------------------------------
IF EXISTS (SELECT 1 FROM sysobjects WHERE name = 'fnHexToInt' AND type IN ('FN', 'IF', 'TF'))
BEGIN
PRINT 'DONE (CREATE FUNCTION: fnHexToInt).'
END
ELSE BEGIN
PRINT '****** FAILES (CREATE FUNCTION: fnHexToInt) ******'
END
PRINT ''
go - SETUSER
go
이 글은 스프링노트에서 작성되었습니다.
'T-SQL' 카테고리의 다른 글
| T-SQL::Removing Duplication Data (1) | 2010.06.03 |
|---|---|
| T-SQL::DB_Restore_move_to (0) | 2010.06.03 |
| T_SQL::CONSTRAINT조사 (1) | 2010.06.03 |
| SQL Server 2005 and 2008 Ranking Functions (0) | 2010.04.05 |
CONSTRAINT 조사
- select * from sys.default_constraints
- select * from sys.key_constraints
- select * from sys.check_constraints
- --=================
- -- 2005용
- --=================
- -- FK
- SELECT object_name(fk.constraint_object_id) AS fk_name,
- fk.constraint_column_id AS fk_clolum,
- object_name(fk.parent_object_id) AS parent_name,
- (select name from sys.columns where object_id = fk.parent_object_id and column_id = fk.parent_column_id) as parent_column,
- object_name(fk.referenced_object_id) AS referenced_name,
- (select name from sys.columns where object_id = fk.referenced_object_id and column_id = fk.referenced_column_id) as referenced_column
- FROM sys.foreign_key_columns as fk
- WHERE fk.parent_object_id = object_id('<@table_name, @sysname,@table_name>')
- or fk.referenced_object_id = object_id('<@table_name, @sysname,@table_name>')
- -- DEFAULT
- SELECT object_name(parent_object_id) as table_name,
- name,
- (select name from sys.columns where object_id = df.parent_object_id and column_id = df.parent_column_id) as column_name,
- definition
- FROM sys.default_constraints as df
- WHERE object_name(parent_object_id) = object_id('<@table_name, @sysname,@table_name>')
- -- DEFAULT
- SELECT
- object_name(parent_object_id) as table_name,
- name,
- (select name from sys.columns where object_id = ck.parent_object_id and column_id = ck.parent_column_id) as column_name,
- definition
- FROM sys.check_constraints as ck
- WHERE object_name(parent_object_id) = object_id('<@table_name, @sysname,@table_name>')
- --=================
- -- 2000용
- --=================
- --FK
- select object_name(fkeyid) , object_name(constid),object_name(rkeyid)
- from sys.sysforeignkeys where fkeyid = object_id ('<@table_name, @sysname,@table_name>')
- select object_name(id), object_name(constid) ,status from sys.sysconstraints
- where status&5 = 1 --FK
- where constid = object_id('<@table_name, @sysname,@table_name>')
- order by object_name(constid)
- --===========================
- -- DROP
- --===========================
- -- FK 2005용
- SELECT 'ALTER TABLE ' + bject_name(fk.parent_object_id) + ' DROP CONSTRAINT ' + object_name(fk.constraint_object_id)
- FROM sys.foreign_key_columns
- WHERE fk.parent_object_id = object_id('<@table_name, @sysname,@table_name>')
- -- DEFULT 2005용
- SELECT 'ALTER TBLE ' + object_name(parent_object_id) + ' DROP CONSTRAINT ' + name
- FROM sys.default_constraints
- WHERE object_name(parent_object_id) = object_id('<@table_name, @sysname,@table_name>')
- -- CK 2005용
- -- DEFULT 2005용
- SELECT 'ALTER TBLE ' + object_name(parent_object_id) + ' DROP CONSTRAINT ' + name
- FROM sys.default_constraints
- WHERE object_name(parent_object_id) = object_id('<@table_name, @sysname,@table_name>')
- -- FK 2000용
- SELECT 'ALTER TABLE ' + object_name(fkeyid) + ' DROP CONSTRAINT ' + object_name(constid)
- FROM sys.sysforeignkeys
- WHERE fkeyid = object_id ('<@table_name, @sysname,@table_name>')
- -- INDEX 2000용
- select 'ALTER TABLE ' + object_name(id) + ' DROP INDEX ' + name
- from sys.sysindexes where object_name(id) in ('GOODSDAQ_BANNER_POSITION')
- order by id, name
이 글은 스프링노트에서 작성되었습니다.
'T-SQL' 카테고리의 다른 글
| T-SQL::DB_Restore_move_to (0) | 2010.06.03 |
|---|---|
| T-SQL::Convert hex value to String 32bit (0) | 2010.06.03 |
| SQL Server 2005 and 2008 Ranking Functions (0) | 2010.04.05 |
| DMV::Index (0) | 2010.04.05 |
-
--===================================
-
-- SP_WHO2와명령어동시확인하기
-
--===================================
-
SELECT
-
ISNULL(D.text, '') AS SQLStatement,
-
object_name(D.objectid) AS 'sp_ame',
-
A.Session_ID SPID,
-
ISNULL(B.status,A.status) AS [Status],
-
A.login_name AS [Login],
-
ISNULL(A.host_name, ' .') AS HostName,
-
ISNULL(CAST(C.BlkBy AS varchar(10)), ' .') AS BlkBy,
-
DB_NAME(B.Database_ID) AS DBName,
-
B.command,
-
ISNULL(B.cpu_time, A.cpu_time) AS CPUTime,
-
ISNULL((B.reads + B.writes),(A.reads + A.writes)) AS DiskIO,
-
A.last_request_start_time AS LastBatch,
-
ISNULL(A.program_name, '') AS ProgramName,
-
ISNULL(A.client_interface_name, '') AS ClientInterfaceName
-
FROM sys.dm_exec_sessions A
-
LEFT OUTER JOIN sys.dm_exec_requests B ON A.session_id = B.session_id
-
LEFT OUTER JOIN (
-
SELECT A.request_session_id SPID, B.blocking_session_id BlkBy
-
FROM sys.dm_tran_locks A
-
INNER JOIN sys.dm_os_waiting_tasks B ON A.lock_owner_address = B.resource_address
-
) C ON A.Session_ID = C.SPID
-
OUTER APPLY sys.dm_exec_sql_text(B.sql_handle) D
-
go
이 글은 스프링노트에서 작성되었습니다.
'Monitoring' 카테고리의 다른 글
| T-SQL:: Default Trace로 DB 증가량 확인 (1) | 2011.04.15 |
|---|---|
| Admin::Tempdb 의 작업, 모니터링 (0) | 2011.01.30 |
| CPU에 할당된 Task 보기 (1) | 2010.03.14 |
| DBCC FLUSHPROCINDB (0) | 2010.02.04 |
백업 DB에서 최근 백업정보
- DBA는 백업은 중요한 일중에 하나이다. 모든 장비를 확인해 가면서 백업 성공/실패를 확인할 수 없으므로 마지막으로 백업된 날짜를 확인하여 메일로 공지되는것이 좋은 방법이다.
- 아래 쿼리는 그 내용이며 위 쿼리와 조합을 해서 백업보고를 받게 할 것이다.
- 해당 보고는 DTS 패키지나 SSIS를 사용해서 처리하거나 JOB으로 장비별로 OSQL을 접속해서 처리하도록 해도 된다. (링크드 서버를 사용하지 않기 위햬)
- select max(isnull(datediff(dd,b.backup_start_date,getdate()),0)) as 'Number of Days since last backup',
b.type as 'Backup type (D-database,L-log)', b.backup_size, d.name as database_name
from master..sysdatabases d with (nolock)
left join msdb..backupset b with (nolock) on d.name = b.database_name
and b.backup_start_date = (select max(backup_start_date)
from msdb..backupset b2
where b.database_name = b2.database_name
and b2.type = 'D')
where d.name != 'tempdb'
group by d.name, b.type, b.backup_size
union all
select max(isnull(datediff(dd,b.backup_start_date,getdate()),0))
as 'Number of Days since last backup',
b.type as 'Backup type (D-database,L-log)', b.backup_size, d.name
as database_name
from master..sysdatabases d with (nolock)
join msdb..backupset b with (nolock)
on d.name = b.database_name
and b.backup_start_date = (select max(backup_start_date)
from msdb..backupset b2
where b.database_name = b2.database_name
and b2.type = 'L')
group by d.name, b.type, b.backup_size
order by d.name,b.type -- optional - ================================================
다른 방법 - ================================================
SELECT
cast(database_name AS varchar(30)) AS [DBName],
cast(user_name AS varchar(30)) AS [UserName],
str(cast(backup_size AS decimal(20,2)) / 1048576 ,10,2) + ' MB' AS [BackupSize],
cast(datediff(n,backup_start_date,backup_finish_date) AS varchar(5)) + ' min.' AS [Duration],
cast(datediff(dd,backup_finish_date,Getdate()) AS varchar(10)) AS [BackupAge],
convert(varchar(20),backup_finish_date) AS [FinishDate],
physical_device_name AS [Location],
mf.device_type
FROM
master..sysdatabases DB
JOIN
msdb..BACKUPSET BS
ON DB.name = BS.database_name
JOIN msdb..backupmediaset MS
ON
BS.media_set_id = MS.media_set_id
JOIN msdb..backupmediafamily MF
ON
BS.media_set_id = MF.media_set_id
JOIN
(
SELECT
max(backup_set_id) AS backup_set_id
FROM
msdb..BACKUPSET BS
JOIN msdb..backupmediaset MS
ON
BS.media_set_id = MS.media_set_id
JOIN msdb..backupmediafamily MF
ON
BS.media_set_id = MF.media_set_id
WHERE
type = 'D'
AND mf.device_type <> 7
GROUP BY database_name
) MaxBackup
ON
BS.backup_set_id = MaxBackup.backup_set_id
WHERE
type = 'D'
이 글은 스프링노트에서 작성되었습니다.
'Backup/Restory' 카테고리의 다른 글
| BACKUP compression (0) | 2010.06.04 |
|---|---|
| Admin::Recovery Model (0) | 2010.06.04 |
| All DB 백업 (0) | 2010.06.03 |
| 복원후에러로그내역궁금증 (0) | 2010.04.04 |
백업
전체 DB를 백업하는 간단한 스크립트.
저장 프로시저로 만들어서 Job 으로 이용해도 됨.
Simple script to backup all databases
Problem
Sometimes things that seem complicated are much easier then you think and this is the power of using T-SQL to take care of repetitive tasks. One of these tasks may be the need to backup all databases on your server. This is not a big deal if you have a handful of databases, but I have seen several servers where there are 100+ databases on the same instance of SQL Server. You could use Enterprise Manager to backup the databases or even use Maintenance Plans, but using T-SQL is a much simpler and faster approach.
Solution
With the use of T-SQL you can generate your backup commands and with the use of cursors you can cursor through all of your databases to back them up one by one. This is a very straight forward process and you only need a handful of commands to do this.
Here is the script that will allow you to backup each database within your instance of SQL Server. You will need to change the @path to the appropriate backup directory and each backup file will take on the name of "DBnameYYYDDMM.BAK".
- DECLARE @name VARCHAR(50) -- database name
DECLARE @path VARCHAR(256) -- path for backup files
DECLARE @fileName VARCHAR(256) -- filename for backup
DECLARE @fileDate VARCHAR(20) -- used for file name
SET @path = 'C:\Backup\'
SELECT @fileDate = CONVERT(VARCHAR(20),GETDATE(),112)
DECLARE db_cursor CURSOR FOR
SELECT name
FROM master.dbo.sysdatabases
WHERE name NOT IN ('master','model','msdb','tempdb')
OPEN db_cursor
FETCH NEXT FROM db_cursor INTO @name
WHILE @@FETCH_STATUS = 0
BEGIN
SET @fileName = @path + @name + '_' + @fileDate + '.BAK'
BACKUP DATABASE @name TO DISK = @fileName
FETCH NEXT FROM db_cursor INTO @name
END
CLOSE db_cursor
DEALLOCATE db_cursor
In this script we are bypassing the system databases, but these could easily be included as well. You could also change this into a stored procedure and pass in a database name or if left NULL it backups all databases. Any way you choose to use it, this script gives you the starting point to simply backup all of your databases.
Automating Transaction Log Backups for All Databases
Problem
Maintenance plans are a great thing, but sometimes the end results are not what you expect. The whole idea behind maintenance plans is to simplify repetitive maintenance tasks without you having to write any additional code. For the most part maintenance plans work without a problem, but every once in awhile things do not go as planned. Two of the biggest uses of maintenance plans are issuing full backups and transaction log backups. What other approaches are there to issue transaction log backups for all databases without using a maintenance plan?
Solution
With the use of T-SQL you can generate your transaction log backups and with the use of cursors you can cursor through all of your databases to back them up one by one. With the use of the DATABASEPROPERTYEX function we can also just address databases that are either in the FULL or BULK_LOGGED recovery model since you can not issue transaction log backups against databases in the SIMPLE recovery mode.
Here is the script that will allow you to backup the transaction log for each database within your instance of SQL Server that is either in the FULL or BULK_LOGGED recovery model.
You will need to change the @path to the appropriate backup directory and each backup file will take on the name of "DBname_YYYDDMM_HHMMSS.TRN".
- DECLARE @name VARCHAR(50) -- database name
DECLARE @path VARCHAR(256) -- path for backup files
DECLARE @fileName VARCHAR(256) -- filename for backup
DECLARE @fileDate VARCHAR(20) -- used for file name
SET @path = 'C:\Backup\'
SELECT @fileDate = CONVERT(VARCHAR(20),GETDATE(),112)
+ '_'
+ REPLACE(CONVERT(VARCHAR(20),GETDATE(),108),':','')
DECLARE db_cursor CURSOR FOR
SELECT name
FROM master.dbo.sysdatabases
WHERE name NOT IN ('master','model','msdb','tempdb')
AND DATABASEPROPERTYEX(name, 'Recovery') IN ('FULL','BULK_LOGGED')
OPEN db_cursor
FETCH NEXT FROM db_cursor INTO @name
WHILE @@FETCH_STATUS = 0
BEGIN
SET @fileName = @path + @name + '_' + @fileDate + '.TRN'
BACKUP LOG @name TO DISK = @fileName
FETCH NEXT FROM db_cursor INTO @name
END
CLOSE db_cursor
DEALLOCATE db_cursor
In this script we are bypassing the system databases, but these could easily be included as well. You could also change this into a stored procedure and pass in a database name or if left NULL it backups all databases. Any way you choose to use it, this script gives you the starting point to simply backup all of your databases.
이 글은 스프링노트에서 작성되었습니다.
'Backup/Restory' 카테고리의 다른 글
| Admin::Recovery Model (0) | 2010.06.04 |
|---|---|
| 백업성공보고 (0) | 2010.06.03 |
| 복원후에러로그내역궁금증 (0) | 2010.04.04 |
| 백업::손상된 백업에 의해 발생한 SQL Server 복원 오류에 응답 (0) | 2009.10.05 |
| Question |
| FOR 문을 이용해서 무한적으로 반복해서 실행하고 싶은 작업이 있습니다. 그러면서도 작업과 작업 사이에 대기시간을 5초 정도 주고 싶습니다. 즉, 매번 반복되면서 5초에 한번씩 A 라는 곳에서 select 해서 B 라는 곳으로 Insert 하는 작업이 필요합니다. 대기시간 주는 것은 여기 사이트에 예시도 있어서 가능 할 것 같은데 계속 실행되면서 select 하려면 어떻게 해야 할까요? |
다음과 같이 For루프 컨테이너를 추가합니다.

루프 편집기에서 다른 조건은 설정할 필요 없이 EvalExpression 속성 값에 true를 입력합니다.

이렇게 설정하는 것은 쿼리에서
WHILE (1=1)
BEGIN
…
END
와 비슷한 형태입니다.
이제, For 루프 컨테이너 안에 필요한 작업들을 설정해서 넣고선, 5초 동안 대기하는 것을 구현해야 합니다.
이전에 올린 글에 FOR 루프 컨테이너를 이용해서 일정 시간 동안 대기하는 것을 구현한 것이 있습니다. 하지만 이 방법은 쓰지 마시기 바랍니다. (CPU가 과도하게 높이 올라갑니다.)
http://www.sqlleader.com/mboard.asp?exec=view&strBoardID=SS2005SSIS&intSeq=523
대신, SQL 명령을 이용하는 것이 가장 바람직할 것 같습니다.
작업들을 구성한 후, 가장 마지막 부분에 SQL 실행 작업을 추가한 후,

DB 연결을 설정하고, 다음과 같은 간단한 명령을 사용합니다.
예) 5초 동안 대기를 해야 할 경우
WAITFOR DELAY ’00:00:05’

매 번 루핑 때 마다 마지막 단계에서 5초간 대기하는 무한 루프가 만들어졌습니다.

이 글은 스프링노트에서 작성되었습니다.
'Business Inteligence (SSIS)' 카테고리의 다른 글
| SSIS::플랫 파일 가져오기 에러. (0) | 2012.02.09 |
|---|---|
| SQL2008에서 SQL2000 DTS열기 (0) | 2010.06.07 |
| 스크립트task사용 (0) | 2010.06.03 |
| Debugging and Logging in SSIS (0) | 2010.06.03 |
Using the script task to dynamically build SSIS package variables
Written By: Hal Hayes -- 2/27/2008
Problem
One of the advantages of using SSIS is the ability to dynamically create tasks that can take different elements and manipulate them in code instead of having to hard code the package to do only one task. In a previous tip we looked at how to use expressions to dynamically build an output file: "Dynamic Flat File Connections in SQL Server Integration Services". In this tip, we will show you another way to do this using the script task.
Solution
Basically what we will be doing is generating an output file name using a package variable, representing the location and name of an output file and using the Script Task to dynamically build the output filename.
Using this method, modifying variable information is not just restricted to output file information. You can use this method to generate input file locations, complex queries that can be used in your Execute SQL tasks, data for inserts, etc. The Script Task is a powerful component that can offer developers capabilities not covered in other Control Flow items.
In this solution we will address the simplest case of using a Script Task to dynamically modify a variable that is assigned to an output flat file connection so that the file is saved with a name and location of our choosing.
Create Package
To start, create a new Integration Services project using the SQL Server Business Intelligence Design Studio (BIDS).
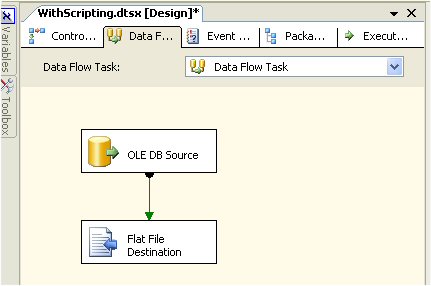
- Add a Data Flow Task to your Control Flow surface
- In the Connection managers, create an OLE DB connection to the AdventureWorks database
- Double click the Data Flow task and add an OLE DB Source, set it to any table or view (in this case I used the Purchasing.vVendor view)
- Add a Flat File Destination and connect the two objects with a Data Source Path (green arrow) as shown below
- Open the Flat File Destination Editor and create a new connection, choosing the output file type (delimited) with a name of "CSV File Output". Also, choose a filename which can be anything at this point, this will be dynamically generated again below, but for now you need some filename to complete this step.
Add Package Variables
Move back to the Control Tab and right click on any area, but not on an object and select Variables. (We do this to make sure that our variables, which we will design in the next step, are scoped to the entire package.) Another way to do this is from the menus by selecting View | Other Windows | Variables.
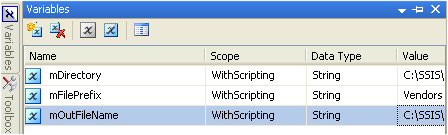
Now add the following variables (within scope of the entire package).
| Name | Description | Type | Value |
| mDirectory | Directory for file output. | String | C:\SSIS\Output |
| mFilePrefix | File name (descriptive name for your organization). | String | Vendors |
| mOutFileName | Resulting output file name and path that will be used with the flat file connection. Set a default value (use the current filepath used by the flat file connection object). | String | C:\SSIS\Output\Vendors.txt |
Note: Our package is called "WithScripting", so here is an example of our variables after they have been setup.
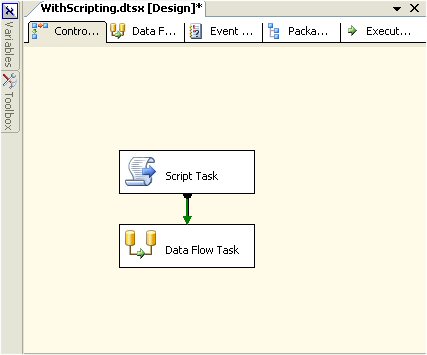
Adding the Script Task
Now add a Script Task to the Control Flow above the Data Flow Task. Connect the two objects (from Script Task to Data Flow Task) with a precedence constraint (green arrow) as shown below.
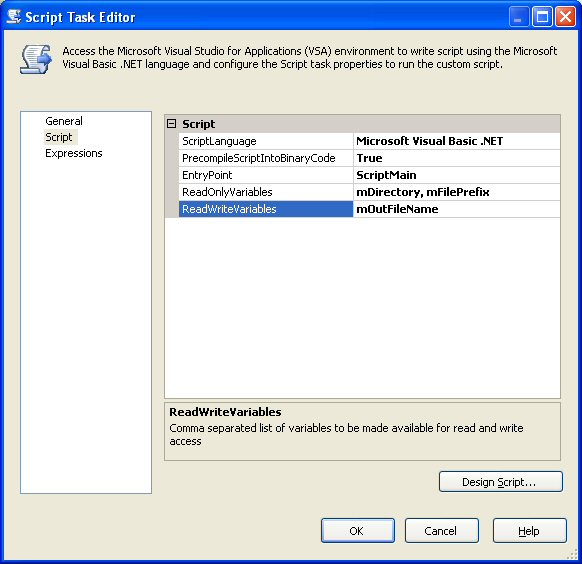
Open the Script Task Editor. We will use the defaults for this item, but we need to add the following to the Script tab.By setting our variables in this property window, we make them available to the Script environment. If this step is not done the package variables can not be used with the script task. Note: the variable names have to match the exact same names that were used, the variables are case sensitive.
| ReadOnlyVariables | mDirectory, mFilePrefix |
| ReadWriteVariables | mOutFileName |
Here is an example of our script variables setup.
Next select the “Design Script...” button. This opens the Visual Studio for Applications (VSA) design environment. By default, you will have a ScriptMain class with a single method, Main.
Replace the Main method with the following text:
| Public Sub Main() ' ' MSSQLTips: Modify Output File Location ' Dim sFinalFileNameAndPath As String Dim sDirectory As String Dim sFilePrefix As String sDirectory = Dts.Variables("mDirectory").Value.ToString If Not (sDirectory.EndsWith("\")) Then sDirectory = sDirectory + "\" End If sFilePrefix = Dts.Variables("mFilePrefix").Value.ToString sFinalFileNameAndPath = sDirectory + sFilePrefix + "-" + Month(Now.Date).ToString + Year(Now.Date).ToString + ".txt" Dts.Variables("mOutFileName").Value = sFinalFileNameAndPath Dts.TaskResult = Dts.Results.Success End Sub |
Here is a snippet of what our script looks like after pasting the above code.
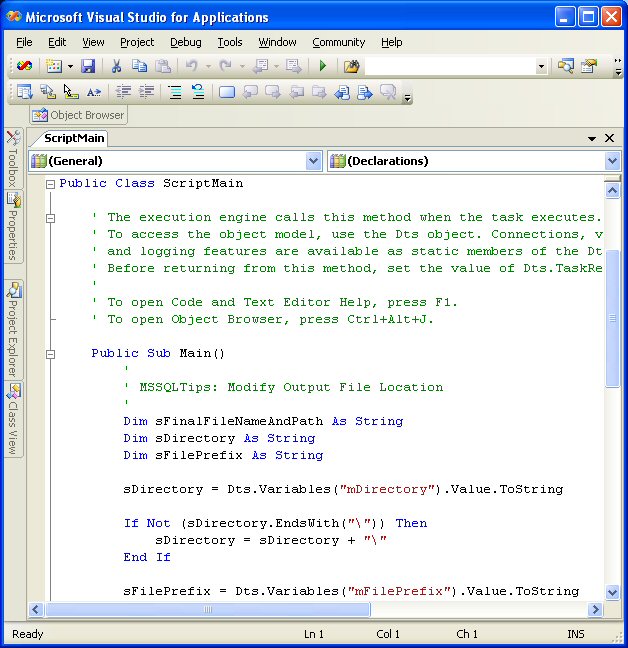
Discussion of VB.Net coding is beyond the scope of this article, but a brief explanation follows. The above code reads the directory information from the SSIS variable into a string variable, and ensures that it ends with a “\” character for the formatting of our full file name and path. The file prefix is also captured in a string variable. We craft our output path and file name in a string variable, dynamically adding the month number and year to the file name. The file extension of “.txt” is added to the end of the file name.
Finally the SSIS variable, mOutFileName, is set to the full file path. Remember that we set this variable as read-write in the Script task. At the end, the script closes by setting the DTS.TaskResult value to success. The setting of this value is required for proper operation of the script (the value could also be set to failure).
Now you can close the VSA environment.
Modify the Flat File Connection
- Select the flat file connection object "CSV File Output"
- Right click and select Properties
- Select the Expressions property and click on the ellipse "..."
- In the Property Expression Editor, select the ConnectionString property as shown below.
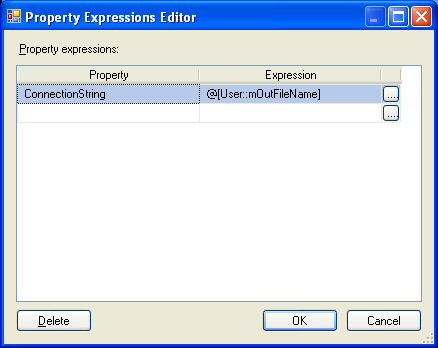
- Next select the “…” button to bring up the Expression Builder interface shown below
- Set the expression to @[User::mOutFileName] by dragging the value down to the Expression window from the Variables window as shown below and select OK.

That is it. Now you have dynamically modified your filename by adding the month and year to the end of it. And you are saving it in the location of your choosing as defined by the mDirectory variable.
So for our example if this was run on February 27, 2008 the file created would be "C:\SSIS\Output\Vendors-22008.txt".
Next Steps
- Now you have another way of dynamically generating file names. You can use this method or use the method found in this tip Dynamic Flat File Connections in SQL Server Integration Services
- Take this a step further and format the date so that it always includes a two month year.
- Also, use this technique to build other dynamic variables that can be used in other parts of your SSIS packages
- Download the SSIS package
이 글은 스프링노트에서 작성되었습니다.
'Business Inteligence (SSIS)' 카테고리의 다른 글
| SQL2008에서 SQL2000 DTS열기 (0) | 2010.06.07 |
|---|---|
| For컨테이너-무한루프 (0) | 2010.06.03 |
| Debugging and Logging in SSIS (0) | 2010.06.03 |
| SSIS::Foreach 이용한 장비별 동일 로직 반복 - ADO 열거자 (1) | 2009.07.27 |
- Debugging and Logging in SSIS
- Use breakpoints and checkpoints to more efficiently debug packages -->-->
- Features
- InstantDoc #98167
- From the April 2008 edition of SQL Server Magazine
It’s been more than two years since SQL Server 2005 shipped with SQL Server Integration Services (SSIS). However, many companies still haven’t converted their DTS packages to SSIS, possibly because the migration process can be painful or they don’t have the time to learn about a new product.
Those of you who have made the conversion know that SSIS definitely isn’t the “next version of DTS.” Debugging and logging are just two of many areas that have undergone a complete overhaul in SSIS. Let’s take a high-level look at SSIS’s debugging and logging capabilities. If you’re among those who are still using DTS, prepare to be impressed.
Debugging Packages During Development
SSIS is far ahead of DTS in the area of debugging, which is the process of identifying errors that prevent a package from being executed or producing the desired results. In DTS, debugging typically involves using MsgBox statements or the VBScript Stop command to simulate a breakpoint in scripts. Such statements had to be removed from the package before it was put into production. In contrast, debugging is built into SSIS, and nothing has to be removed when the package is moved to a production environment.
The problem with SSIS’s debugging tools is that they aren’t consistent across all types of tasks, so knowing when to use what tools can be a big help. Let’s look at SSIS’s debugging capabilities at the package level, followed by debugging within Control Flow tasks and Data Flow tasks.
Package-Level Debugging
During the development process, SSIS provides red or yellow icons within the SSIS designer that tell you when something is inherently wrong with the package. To view the message associated with an icon in a collection of packages, hover your mouse over the icon, as
shows. These messages are typically related to data-source connections or data-type problems. Because it can take time to sift through the messages in the Output pane (which is located below the Error List pane in the SSIS designer) during debugging to see what caused a package to fail, SSIS lets you click the Progress tab from the designer to view an outline structure of the package, as Figure 2 shows, and see where the failure took place.
When you debug a package in a Business Intelligence Development Studio environment, you can see which task is running and how far it’s progressed by the background color of the task: Yellow indicates that the task is running, green indicates that the task completed successfully, and red indicates that the task completed with errors. Next to Data Flow tasks, you also get a count of the rows that have been processed by the task. You might notice that SSIS often runs multiple tasks simultaneously, whereas DTS runs only one task at a time. The pipeline nature of SSIS is one of the core architectural differences between it and DTS.
Debugging Control Flow Tasks
Control Flow tasks control the flow of the package. SSIS’s debugging tools for Control Flow tasks closely resemble those available in any respectable development environment. Breakpoints and the Debug windows can be especially helpful in debugging Control Flow tasks.
Breakpoints tell SSIS to pause execution at the indicated point in the package. When processing encounters a breakpoint in Debug mode, processing pauses, and the Debug windows give you access to additional information such as variable values, call stacks, and status messages. You can set breakpoints at the package, container, task, or Script task level. You can even set breakpoints to pause after a given number of encounters with an event, such as on the tenth iteration of a task in a For Loop construct. Figure 3 shows how you can interrogate an object to reveal its property values during a breakpoint session.
I find the Locals window, which is accessible from the Debug/Windows/Locals menu item, to be the most useful of SSIS’s Debug windows. It displays values for all the variables in the package and even lets you modify variable values, which can be useful when skipping ahead to a later point in the package or simulating certain conditions during package development.
Debugging Data Flow Tasks
Data Flow tasks control how and when data is manipulated in the package. The primary debugging tool available in Data Flow tasks is the data viewer. I use the data viewer during the development of Data Flow tasks to see what the data looks like in the pipeline as it flows from one task to another—usually just before the task that actually loads the data into its destination.
You can add a data viewer between two Data Flow tasks by right-clicking the connector between the tasks, selecting Data Viewers, and then selecting the data viewer you want to use. You can view the data in a grid, chart, scatter plot, or histogram. I usually view data in a grid, as shown in Web Figure 1, but I recommend playing with all four data viewers to get a feel for when you should use each one. Although I typically remove my data viewers before deploying a package in production, you don’t have to do so.
You can modify columns displayed by a data viewer either as you set up the data viewer or after setup. To modify a data viewer after you’ve created it, right-click the connector, select Data Viewers, highlight the data viewer, then click Configure.
Another Data Flow task debugging technique that I use frequently during package development and debugging is the RowCount task. The RowCount task relates only to Data Flow tasks. The RowCount task isn’t usually billed as a debugging tool but can be quite useful as one. The RowCount task simply counts the rows passed through the pipeline and puts the final row count into a variable. I almost always use the RowCount task as my initial data destination because it serves as a way of examining the data, via a data viewer, without actually loading the data anywhere. Because the Row- Count task carries no measurable overhead, it can also be used for baselining or to diagnose performance problems. For more information about using the RowCount task, see the Microsoft white paper
Integration Services: Performance Tuning Techniques” (www.microsoft.com/technet/prodtechnol/sql/2005/ssisperf.mspx).
이 글은 스프링노트에서 작성되었습니다.
'Business Inteligence (SSIS)' 카테고리의 다른 글
| SQL2008에서 SQL2000 DTS열기 (0) | 2010.06.07 |
|---|---|
| For컨테이너-무한루프 (0) | 2010.06.03 |
| 스크립트task사용 (0) | 2010.06.03 |
| SSIS::Foreach 이용한 장비별 동일 로직 반복 - ADO 열거자 (1) | 2009.07.27 |
Inserting, Updating or Deleting Data in SQL Server from an Excel Spreadsheet
Problem
I have seen your previous tips (Export data from SQL Server to Excel and Different Options for Importing Data into SQL Server) related to working with Excel and SQL Server data. The main command used in one of the tips is OPENROWSET. This has been beneficial for us because in our environment because our business users provide data to us in the form of Excel spreadsheets. Many of the situations end up translating to INSERT, UPDATE or DELETE code in one or more of our SQL Server databases. We always upload the data to a table and then begin the process. Although this process works are you familiar with any other options to directly perform the INSERT, UPDATE or DELETE operations? Are their any benefits to transitioning our code to another approach with the OPENROWSET command?
Solution
Yes - You are correct the OPENROWSET command can directly support INSERT, UPDATE or DELETE operations as shown in these tips: Export data from SQL Server to Excel and Different Options for Importing Data into SQL Server. In addition, the OPENROWSET command can also support SELECT statements where a table is joined to the Excel spreadsheet. Let's work through some examples with the SQL Server 2005 AdventureWorks sample database for each operation with a sample Excel spreadsheet.
Prerequisites
For all of these examples, please do the following:
- Download this Excel (Office 2003) spreadsheet to perform the operations.
- In order to follow the examples, be sure to save the Excel spreadsheet into a directory called C:\MSSQLTips\.
- Review each of the worksheets in the Excel file to see the different data.
- Be sure to close the Excel spreadsheet before running any of the code.
- Review each of the commands below before executing them in your environment.
OPENROWSET Examples
Below are four examples to show some of the flexibility with the OPENROWSET command:
|
SELECT with a JOIN and ORDER BY Clause |
| Code Explanation - With the query below, 5 records should be returned to show a simple INNER JOIN statement can return a single result set from both data in the table ([Sales].[SalesPerson]) and Excel spreadsheet. |
| SELECT SP.[SalesPersonID] ,SP.[TerritoryID] ,SP.[SalesQuota] ,SP.[Bonus] ,SP.[CommissionPct] ,SP.[SalesYTD] ,SP.[SalesLastYear] ,SP.[rowguid] ,SP.[ModifiedDate] ,T.[SalesPersonID] ,T.[TerritoryID] FROM [AdventureWorks].[Sales].[SalesPerson] SP INNER JOIN OPENROWSET('Microsoft.Jet.OLEDB.4.0', 'Excel 8.0;Database=C:\MSSQLTips\1540_OPENROWSET_Examples.xls;', 'SELECT SalesPersonID, TerritoryID FROM [SELECT_Example$]') T ON SP.[SalesPersonID] = T.[SalesPersonID] AND SP.[TerritoryID] = T.[TerritoryID] ORDER BY SP.[SalesPersonID], SP.[TerritoryID] GO |
|
INSERT with a SELECT Statement |
| Code Explanation - With the first block of code, five records are inserted into the [AdventureWorks].[Sales].[SalesPerson] table by reading the data from the INSERT_Example worksheet of the Excel spreadsheet. In the second query, the data inserted is verified. |
| INSERT INTO [AdventureWorks].[Sales].[SalesPerson](SalesPersonID, TerritoryID, SalesQuota, Bonus, CommissionPct, SalesYTD, SalesLastYear, rowguid, ModifiedDate) SELECT SalesPersonID ,TerritoryID ,SalesQuota ,Bonus ,CommissionPct ,SalesYTD ,SalesLastYear ,NEWID() ,GETDATE() FROM OPENROWSET('Microsoft.Jet.OLEDB.4.0', 'Excel 8.0;Database=C:\MSSQLTips\1540_OPENROWSET_Examples.xls;', 'SELECT SalesPersonID, TerritoryID, SalesQuota, Bonus, CommissionPct, SalesYTD, SalesLastYear FROM [INSERT_Example$]') GO SELECT * |
|
UPDATE with a JOIN Statement |
| Code Explanation - With the first block of code, five records are updated in the [AdventureWorks].[Sales].[SalesPerson] table by reading the data from the UPDATE_Example worksheet of the Excel spreadsheet. In the second query, the data updated is verified. |
| UPDATE SP SET SP.Bonus = T.Bonus FROM [AdventureWorks].[Sales].[SalesPerson] SP INNER JOIN OPENROWSET('Microsoft.Jet.OLEDB.4.0', 'Excel 8.0;Database=C:\MSSQLTips\1540_OPENROWSET_Examples.xls;', 'SELECT SalesPersonID, TerritoryID, SalesQuota, Bonus FROM [UPDATE_Example$]') T ON SP.SalesPersonID = T.SalesPersonID AND SP.TerritoryID = T.TerritoryID AND SP.SalesQuota = T.SalesQuota GO SELECT * |
|
DELETE with a JOIN Statement |
| Code Explanation - With the first block of code, five records are deleted in the [AdventureWorks].[Sales].[SalesPerson] table by reading the data from the DELETE_Example worksheet of the Excel spreadsheet. In the second query, the data deleted is verified. |
| DELETE SP FROM [AdventureWorks].[Sales].[SalesPerson] SP INNER JOIN OPENROWSET('Microsoft.Jet.OLEDB.4.0', 'Excel 8.0;Database=C:\MSSQLTips\1540_OPENROWSET_Examples.xls;', 'SELECT SalesPersonID, TerritoryID, SalesQuota, Bonus FROM [UPDATE_Example$]') T ON SP.SalesPersonID = T.SalesPersonID AND SP.TerritoryID = T.TerritoryID GO SELECT * |
General Analysis
In terms of transitioning your code to the new approach, I have yet to experience any performance issues with 1000's of records, but that seems to be the first concern. If you test the approach and the overall performance is not an issue, then consider the approach. It also may be faster to perform a single UPDATE as is the case with the example above versus uploading (INSERT...SELECT) the data and then performing an UPDATE based on the new table. In addition, by using the commands listed above versus a two step process the overall code may be a little bit cleaner. A second consideration with SQL Server 2005 is that the Surface Area Configuration setting must be enabled to use this code in either case. Finally, with either approach be sure to clean up any Excel spreadsheets or temporary tables once you are finished with them.
이 글은 스프링노트에서 작성되었습니다.
'ETC' 카테고리의 다른 글
| 네할렘 아키텍쳐 (0) | 2010.06.10 |
|---|---|
| 최상위 코어 i7 프로세서를 낳은 인텔 네할렘 아키텍처 (0) | 2010.06.10 |
| Active Directory Management (0) | 2009.09.16 |
| Windows용 Dr. Watson (0) | 2009.09.14 |
JOB 등록 하실 때 단계 실패 시 로그를 남기게 하는 방법이 몇 가지 있습니다.
SSIS 패키지 경우 LOG 파일을 지정해서 저장하게 하는 경우가 많은데요. (그럼 에러를 찾기가 조금 수훨 해 집니다.)
그에 관련한 내역입니다. 한번씩 보세요.
아래 그림 처럼 setting을 하곤 합니다.
여기에 기존 파일에 출력 추가를 하게 되면 해당 파일에 계속 커지면서 쌓입니다.
체크하지 않으면 실행될 때 내용을 모두 지우고 다시 쓰기 작업 합니다.
단계가 어떻게 셋팅 되어 있는지 JOB을 보지 않고 알 수 있는 쿼리입니다. (1번 쿼리 )
많이 사용하지는 않을 수 있으나 JOB을 보기가 힘들 때는 유용할 것 같습니다.
2.만약 단계를 테이블 출력으로 저장해 두었다면(자주 사용하지는 않습니다 워낙 job이 많아서)
아래 구문 처 럼 select 해서 보시면 진행 log 내역을 볼 수 있습니다.
테이블 출력으로 해 놓은 job은 sysjobstepslogs 에 저장됩니다.
관련 테이블은 msdb.dbo.sysjobs_view, msdb.dbo.sysjobsteps, sysjobstepslogs
EXEC msdb.dbo.sp_help_jobsteplog @job_name = N'job_명
1. 셋팅 방법 확인
;WITH Flags (FlagID, FlagValue)
AS
(
   SELECT 0 AS FlagID, 'Overwrite output file' AS FlagValue UNION ALL
   SELECT 2 AS FlagID, 'Append to output file' AS FlagValue UNION ALL
   SELECT 4 AS FlagID, 'Write Transact-SQL job step output to step history' AS FlagValue UNION ALL
   SELECT 8 AS FlagID, 'Write log to table (overwrite existing history)' UNION ALL
   SELECT 16 AS FlagID, 'Write log to table (append to existing history)'
),
JobsInfo (Job_Name, Jobstep_ID, Jobstep_Name, Flags)
AS
(
SELECT
  j.name as [Job_Name]
  , js.step_name as [Jobstep_Name]
   , js.step_id as [Jobstep_ID]
   , flags
FROM msdb.dbo.sysjobsteps js JOIN msdb.dbo.sysjobs j
ON js.job_id = j.job_id
),
FinalData (Job_Name, JobStep_Name, [Jobstep_ID], FlagValue)
AS
(
SELECT
   Job_Name
   , Jobstep_Name
   , [Jobstep_ID]
   , F.FlagValue
FROM JobsInfo JI CROSS JOIN Flags F
WHERE JI.Flags & F.FlagID <> 0
)

SELECT DISTINCT
   JI.Job_Name
   , JI.[Jobstep_ID]
   , JI.Jobstep_Name
   , ISNULL(STUFF (( SELECT ', ' + FD2.FlagValue FROM FinalData FD2
WHERE FD2.Job_Name = FD1.Job_Name AND FD2.Jobstep_Name = FD1.Jobstep_Name
ORDER BY ', ' + FD2.FlagValue FOR XML PATH('')), 1, 1, ' '), 'Overwrite output file') AS OptionsSet
FROM FinalData FD1 RIGHT OUTER JOIN JobsInfo JI
ON FD1.Job_Name = JI.Job_Name AND FD1.Jobstep_Name = JI.Jobstep_Name
ORDER BY Job_Name, Jobstep_Name
'Common Admin' 카테고리의 다른 글
| WMI Providers (1) | 2010.06.04 |
|---|---|
| SID및ID (0) | 2010.06.04 |
| admin::여러 TCP 포트에서 수신하도록 데이터베이스 엔진 구성 (0) | 2010.04.04 |
| Suspect 상태 해결 - SQL 2000 (1) | 2010.04.04 |
복제에 문제가 생길 때 보실 수 있는 내역입니다. 어제 이 방법으로 확인했습니다.
평소 문제가 없을때는 MSrepl_commands 조회시 top 을 주시는 것이 좋습니다.
-- 에러가나는agent에대한마지막으로실행된명령어정보확인
select agent_id, max(xact_seqno) as 'MaxTranNo', max(time) as 'Lasted'
from Msdistribution_history with (nolock)
where xact_seqno > 0x0 and agent_id = 29
group by agent_id
order by agent_id
1. 해당 게시명은 아는데 agent를 모를 경우 쉽게 알 수 있는 법은 배포 장비의 job중에 해당 게시의 배포 agent 명을 보면 뒤에 붙어 있는 숫자가 Agent 아이디 입니다.
아니면 select id, name , publication from MSdistribution_agents 하면 게시에 대한 agent를 확인 할 수 있습니다.
-- 마지막실행된이후명령어갯수확인
select top 10 sys.fn_sqlvarbasetostr(min(xact_seqno))
from MSrepl_commands as c with (nolock)
inner join MSarticles as a with (nolock) on c.article_id =a.article_id
inner join MSpublications as p with (nolock) on a.publication_id =
p.publication_id
where c.publisher_database_id = 2
and p.publication = '게시명'
and c.xact_seqno > 0x004BDF9200501314000C
--order by c.xact_seqno
2. 1번에서 실행된 agent에서 가장 마지막으로 실행된 xact_seqno 를 아셨으면 그 번호 이상인 명령이 무엇인지 확인하는 것입니다.
이때 MSrepl_commands 테이블만으로 조해 해보면 모든 게시자 DB에 여러 개의 게시가 있을 경우 다른 게시에 대한 것도 보이니 아티클로 아셔서 보시거나 윗 처럼 조인해서 보시면 됩니다.
-- 최종으로어떤명령어인지확인
exec sp_browsereplcmds
@xact_seqno_start = '0x004BDF9200501DD30018'
,@xact_seqno_end = '0x004BDF92005085BD0014'
,@publisher_database_id = 2
-- ,@agent_id = 29
3. 최종적으로 비슷한 xact_seqno가 동일한게 여러 개 보이면 범위주어서 찾아보시면 됩니다.
인자로 @agent_id 값을 넣으면 조회가 오래 걸리니 안 넣으시게 좋을 것 같습니다.
추가 ) 지연된 명령어 수 확인
exec sp_replmonitorsubscriptionpendingcmds

 @publisher ='Enter publisher server name',

 @publisher_db = 'Enter publisher database name',

 @publication ='Enter name of publication',

 @subscriber ='Enter subscriber server name',

 @subscriber_db ='Enter subscriber database name',

 @subscription_type ='0' --0 for push and 1 for pull
'Replication' 카테고리의 다른 글
| 복제::머지복제에러 (0) | 2010.06.04 |
|---|---|
| 복제::스냅숏 DB를 사용한 게시 초기화 (0) | 2010.06.04 |
| 복제::잘못 삭제 했을 경우 (0) | 2010.03.15 |
| 복제::트랜잭션 복제 배포agent 실행중 상태 모니터링 (0) | 2009.12.28 |
'T-SQL' 카테고리의 다른 글
| T-SQL::Convert hex value to String 32bit (0) | 2010.06.03 |
|---|---|
| T_SQL::CONSTRAINT조사 (1) | 2010.06.03 |
| DMV::Index (0) | 2010.04.05 |
| T-SQL::특정 objects 찾기 (0) | 2010.04.04 |
SQL SERVER 2005 이상
SQL 2005는 DMV를 통해서 실시간으로 인덱스의 사용빈도, 변경 횟수, lock 현황, missing 된 인덱스 정보를 제공한다.
이 자료를 바탕으로 튜닝과 관리 모니터링이 가능하다.
DMV의 정보는 마지막으로 SQL 인스턴스가 시작된 후로 누적된 값이다.
사용하고 있는 INDEX 무엇인가?
DDL 문을 통해 인덱스를 생성하게 되면 인덱스가 카탈로그는 업데이트 된다.
그렇다고 이 인덱스가 "USE" 사용되는 것은 아니다. 인덱스가 select, insert, update가 될 때 sys.dm_db_index_usage_stats 에서 정보를 찾을 수 있다.
마지막으로 SQL SERVER를 방금 재 시작 했다면 sys.dm_db_index_usage_stats 정보를 찾을 수 없을 수도 있다.
user_seeks : 사용자 쿼리별 검색(Seek) 수입니다.
user_scans : 사용자 쿼리별 검색(Scan) 수입니다.
user_lookups : 사용자 쿼리별 책갈피 조회 수입니다.
user_updates : 사용자 쿼리별 업데이트 수
사용하지 않는 테이블 & 인덱스
-
-- unused tables & indexes.
-
DECLARE @dbid INT
-
SET @dbid = DB_ID('AdventureWorks')
-
-
SELECT OBJECT_NAME(IDX.object_id) as object_name,
-
IDX.name AS index_name,
-
CASE WHEN IDX.type = 1 THEN 'Clustered'
-
WHEN IDX.type = 2 THEN 'Non-Clustered'
-
ELSE 'Unknown' END Index_Type
-
FROM sys.dm_db_index_usage_stats AS DIS
-
RIGHT OUTER JOIN sys.indexes AS IDX ON DIS.object_id = IDX.object_id AND DIS.index_id = IDX.index_id
-
JOIN sys.objects AS OBJ ON IDX.object_id = OBJ.object_ID
-
WHERE OBJ.type IN ('U', 'V') AND DIS.object_id IS NULL
-
ORDER BY OBJECT_NAME(IDX.object_id), IDX.name
드물게 사용하는 인덱스
-
DECLARE @dbid INT
-
SET @dbid = DB_ID('AdventureWorks')
-
-
--- rarely used indexes appear first
-
SELECT OBJECT_NAME(DIS.object_id) as object_name,
-
IDX.name AS index_name, IDX.index_id,
-
CASE WHEN IDX.type = 1 THEN 'Clustered'
-
WHEN IDX.type = 2 THEN 'Non-Clustered'
-
ELSE 'Unknown' END Index_Type,
-
DIS.user_seeks, DIS.user_scans, DIS.user_lookups, DIS.user_updates
-
FROM sys.dm_db_index_usage_stats AS DIS
-
JOIN sys.indexes AS IDX ON DIS.object_id = IDX.object_id AND DIS.index_id = IDX.index_id
-
WHERE DIS.database_id = @dbid AND objectproperty(DIS.object_id,'IsUserTable') = 1
-
--AND DIS.user_updates > 0 AND DIS.user_seeks = 0
--AND DIS.user_scans = 0 AND DIS.user_lookups = 0 --(업데이트는 일어나는 사용되지 않은것, 관리 부담만 있다.)
-
ORDER BY (DIS.user_updates + DIS.user_seeks + DIS.user_scans + DIS.user_lookups ) asc
인덱스에 lock 이 걸려있는 지 확인
- declare @dbid int
- select @dbid = db_id()
- Select dbid=database_id, objectname=object_name(s.object_id)
, indexname=i.name, i.index_id --, partition_number
, row_lock_count, row_lock_wait_count
, [block %]=cast (100.0 * row_lock_wait_count / (1 + row_lock_count) as numeric(15,2))
, row_lock_wait_in_ms
, [avg row lock waits in ms]=cast (1.0 * row_lock_wait_in_ms / (1 + row_lock_wait_count) as numeric(15,2))
from sys.dm_db_index_operational_stats (@dbid, NULL, NULL, NULL) s, sys.indexes i
where objectproperty(s.object_id,'IsUserTable') = 1
and i.object_id = s.object_id
and i.index_id = s.index_id
order by row_lock_wait_count desc
실시간 LOCK 확인 -- 다른 LOOK 쿼리 확인. 구분 이해하기
위에 부분은 실시간으로 처리되는 것이 아니라 누적된 결과를 보는 쿼리 이다. 실시간으로 락이 걸려있는 상태를 확이낳려면 프로시저를 생성하고 처리 결과를 보는것도 좋은 방법이다.
- create proc sp_block_info
as
set rowcount ON
select t1.resource_type as [lock type]
,db_name(resource_database_id) as [database]
,t1.resource_associated_entity_id as [blk object]
,t1.request_mode as [lock req] --- lock requested
,t1.request_session_id as [waiter sid] --- spid of waiter
,t2.wait_duration_ms as [wait time]
,(select text from sys.dm_exec_requests as r --- get sql for waiter
cross apply sys.dm_exec_sql_text(r.sql_handle)
where r.session_id = t1.request_session_id) as waiter_batch
,(select substring(qt.text,r.statement_start_offset/2,
(case when r.statement_end_offset = -1
then len(convert(nvarchar(max), qt.text)) * 2
else r.statement_end_offset end - r.statement_start_offset)/2)
from sys.dm_exec_requests as r
cross apply sys.dm_exec_sql_text(r.sql_handle) as qt
where r.session_id = t1.request_session_id) as waiter_stmt --- statement blocked
,t2.blocking_session_id as [blocker sid] -- spid of blocker
,(select text from sys.sysprocesses as p --- get sql for blocker
cross apply sys.dm_exec_sql_text(p.sql_handle)
where p.spid = t2.blocking_session_id) as blocker_stmt
from
sys.dm_tran_locks as t1,
sys.dm_os_waiting_tasks as t2
where t1.lock_owner_address = t2.resource_address
set rowcount OFF
go
SEE ALSO : http://blogs.msdn.com/sqlcat/archive/2005/12/12/502735.aspx
'T-SQL' 카테고리의 다른 글
| T_SQL::CONSTRAINT조사 (1) | 2010.06.03 |
|---|---|
| SQL Server 2005 and 2008 Ranking Functions (0) | 2010.04.05 |
| T-SQL::특정 objects 찾기 (0) | 2010.04.04 |
| T-SQL::Attach (1) | 2009.12.01 |
[code sql] select -- object_name(sql_text.objectid) as 'SP명' ses.session_id , ses.host_name , ses.program_name , ses.client_interface_name , ses.login_name --, (case when sr.statement_end_offset = -1 -- then len(convert(nvarchar(max), sql_text.text)) * 2 -- else sr.statement_end_offset end - sr.statement_start_offset)/2) , * from sys.dm_os_schedulers as ss with (nolock) inner join sys.dm_os_tasks as st with (nolock) on ss.scheduler_id = st.scheduler_id inner join sys.dm_exec_requests as sr with (nolock) on st.request_id = sr.request_id inner join sys.dm_exec_sessions as ses with (nolock) on sr.session_id = ses.session_id cross apply sys.dm_exec_sql_text(sr.sql_handle) as sql_text where ss.scheduler_id = 24 -- cpu 번호 [/code]
 Prev
Prev

