Using the script task to dynamically build SSIS package variables
Written By: Hal Hayes -- 2/27/2008
Problem
One of the advantages of using SSIS is the ability to dynamically create tasks that can take different elements and manipulate them in code instead of having to hard code the package to do only one task. In a previous tip we looked at how to use expressions to dynamically build an output file: "Dynamic Flat File Connections in SQL Server Integration Services". In this tip, we will show you another way to do this using the script task.
Solution
Basically what we will be doing is generating an output file name using a package variable, representing the location and name of an output file and using the Script Task to dynamically build the output filename.
Using this method, modifying variable information is not just restricted to output file information. You can use this method to generate input file locations, complex queries that can be used in your Execute SQL tasks, data for inserts, etc. The Script Task is a powerful component that can offer developers capabilities not covered in other Control Flow items.
In this solution we will address the simplest case of using a Script Task to dynamically modify a variable that is assigned to an output flat file connection so that the file is saved with a name and location of our choosing.
Create Package
To start, create a new Integration Services project using the SQL Server Business Intelligence Design Studio (BIDS).
- Add a Data Flow Task to your Control Flow surface
- In the Connection managers, create an OLE DB connection to the AdventureWorks database
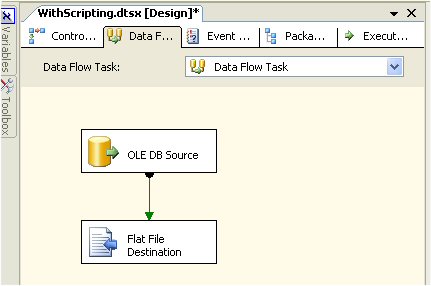
- Double click the Data Flow task and add an OLE DB Source, set it to any table or view (in this case I used the Purchasing.vVendor view)
- Add a Flat File Destination and connect the two objects with a Data Source Path (green arrow) as shown below
- Open the Flat File Destination Editor and create a new connection, choosing the output file type (delimited) with a name of "CSV File Output". Also, choose a filename which can be anything at this point, this will be dynamically generated again below, but for now you need some filename to complete this step.
Add Package Variables
Move back to the Control Tab and right click on any area, but not on an object and select Variables. (We do this to make sure that our variables, which we will design in the next step, are scoped to the entire package.) Another way to do this is from the menus by selecting View | Other Windows | Variables.
Now add the following variables (within scope of the entire package).
| Name | Description | Type | Value |
| mDirectory | Directory for file output. | String | C:\SSIS\Output |
| mFilePrefix | File name (descriptive name for your organization). | String | Vendors |
| mOutFileName | Resulting output file name and path that will be used with the flat file connection. Set a default value (use the current filepath used by the flat file connection object). | String | C:\SSIS\Output\Vendors.txt |
Note: Our package is called "WithScripting", so here is an example of our variables after they have been setup.

Adding the Script Task
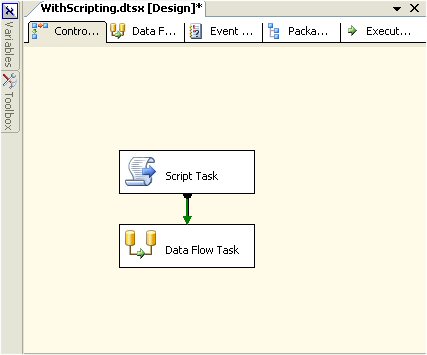
Now add a Script Task to the Control Flow above the Data Flow Task. Connect the two objects (from Script Task to Data Flow Task) with a precedence constraint (green arrow) as shown below.
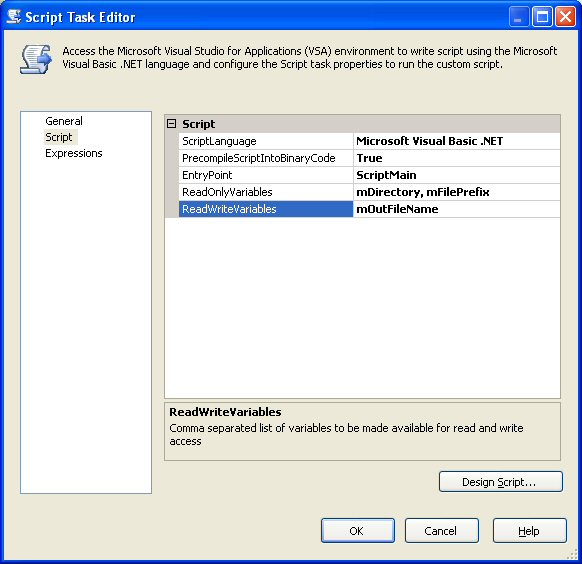
Open the Script Task Editor. We will use the defaults for this item, but we need to add the following to the Script tab.By setting our variables in this property window, we make them available to the Script environment. If this step is not done the package variables can not be used with the script task. Note: the variable names have to match the exact same names that were used, the variables are case sensitive.
| ReadOnlyVariables | mDirectory, mFilePrefix |
| ReadWriteVariables | mOutFileName |
Here is an example of our script variables setup.
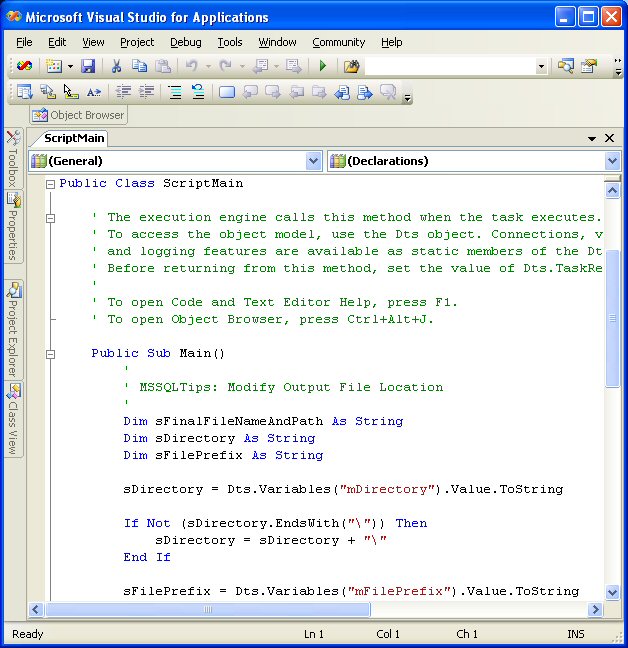
Next select the “Design Script...” button. This opens the Visual Studio for Applications (VSA) design environment. By default, you will have a ScriptMain class with a single method, Main.
Replace the Main method with the following text:
| Public Sub Main() ' ' MSSQLTips: Modify Output File Location ' Dim sFinalFileNameAndPath As String Dim sDirectory As String Dim sFilePrefix As String sDirectory = Dts.Variables("mDirectory").Value.ToString If Not (sDirectory.EndsWith("\")) Then sDirectory = sDirectory + "\" End If sFilePrefix = Dts.Variables("mFilePrefix").Value.ToString sFinalFileNameAndPath = sDirectory + sFilePrefix + "-" + Month(Now.Date).ToString + Year(Now.Date).ToString + ".txt" Dts.Variables("mOutFileName").Value = sFinalFileNameAndPath Dts.TaskResult = Dts.Results.Success End Sub |
Here is a snippet of what our script looks like after pasting the above code.
Discussion of VB.Net coding is beyond the scope of this article, but a brief explanation follows. The above code reads the directory information from the SSIS variable into a string variable, and ensures that it ends with a “\” character for the formatting of our full file name and path. The file prefix is also captured in a string variable. We craft our output path and file name in a string variable, dynamically adding the month number and year to the file name. The file extension of “.txt” is added to the end of the file name.
Finally the SSIS variable, mOutFileName, is set to the full file path. Remember that we set this variable as read-write in the Script task. At the end, the script closes by setting the DTS.TaskResult value to success. The setting of this value is required for proper operation of the script (the value could also be set to failure).
Now you can close the VSA environment.
Modify the Flat File Connection
- Select the flat file connection object "CSV File Output"
- Right click and select Properties
- Select the Expressions property and click on the ellipse "..."
- In the Property Expression Editor, select the ConnectionString property as shown below.
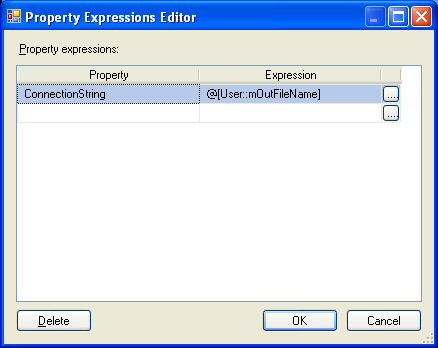
- Next select the “…” button to bring up the Expression Builder interface shown below
- Set the expression to @[User::mOutFileName] by dragging the value down to the Expression window from the Variables window as shown below and select OK.
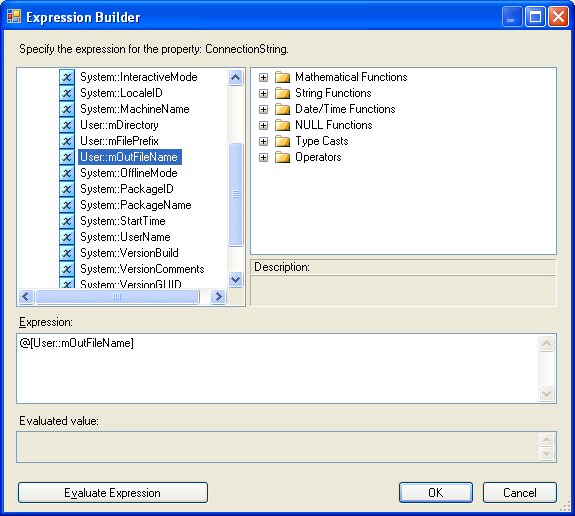
That is it. Now you have dynamically modified your filename by adding the month and year to the end of it. And you are saving it in the location of your choosing as defined by the mDirectory variable.
So for our example if this was run on February 27, 2008 the file created would be "C:\SSIS\Output\Vendors-22008.txt".
Next Steps
- Now you have another way of dynamically generating file names. You can use this method or use the method found in this tip Dynamic Flat File Connections in SQL Server Integration Services
- Take this a step further and format the date so that it always includes a two month year.
- Also, use this technique to build other dynamic variables that can be used in other parts of your SSIS packages
- Download the SSIS package
이 글은 스프링노트에서 작성되었습니다.
'Business Inteligence (SSIS)' 카테고리의 다른 글
| SQL2008에서 SQL2000 DTS열기 (0) | 2010.06.07 |
|---|---|
| For컨테이너-무한루프 (0) | 2010.06.03 |
| Debugging and Logging in SSIS (0) | 2010.06.03 |
| SSIS::Foreach 이용한 장비별 동일 로직 반복 - ADO 열거자 (1) | 2009.07.27 |


